E-LabelCrop

10 Product Photography Tips

for E-commerce Sellers

Master professional-quality photography with just your smartphone and simple props

Why Great Product Photos Drive Sales

In the world of e-commerce, your product photos are your virtual storefront. They're often the first and only interaction customers have with your products before making a purchase decision. Studies show that high-quality images can increase conversion rates by up to 30% and significantly reduce return rates by 64%.

The good news? You don't need a $10,000 camera setup. With these 10 proven techniques, your smartphone, and some creativity, you'll be capturing professional-quality images that sell.
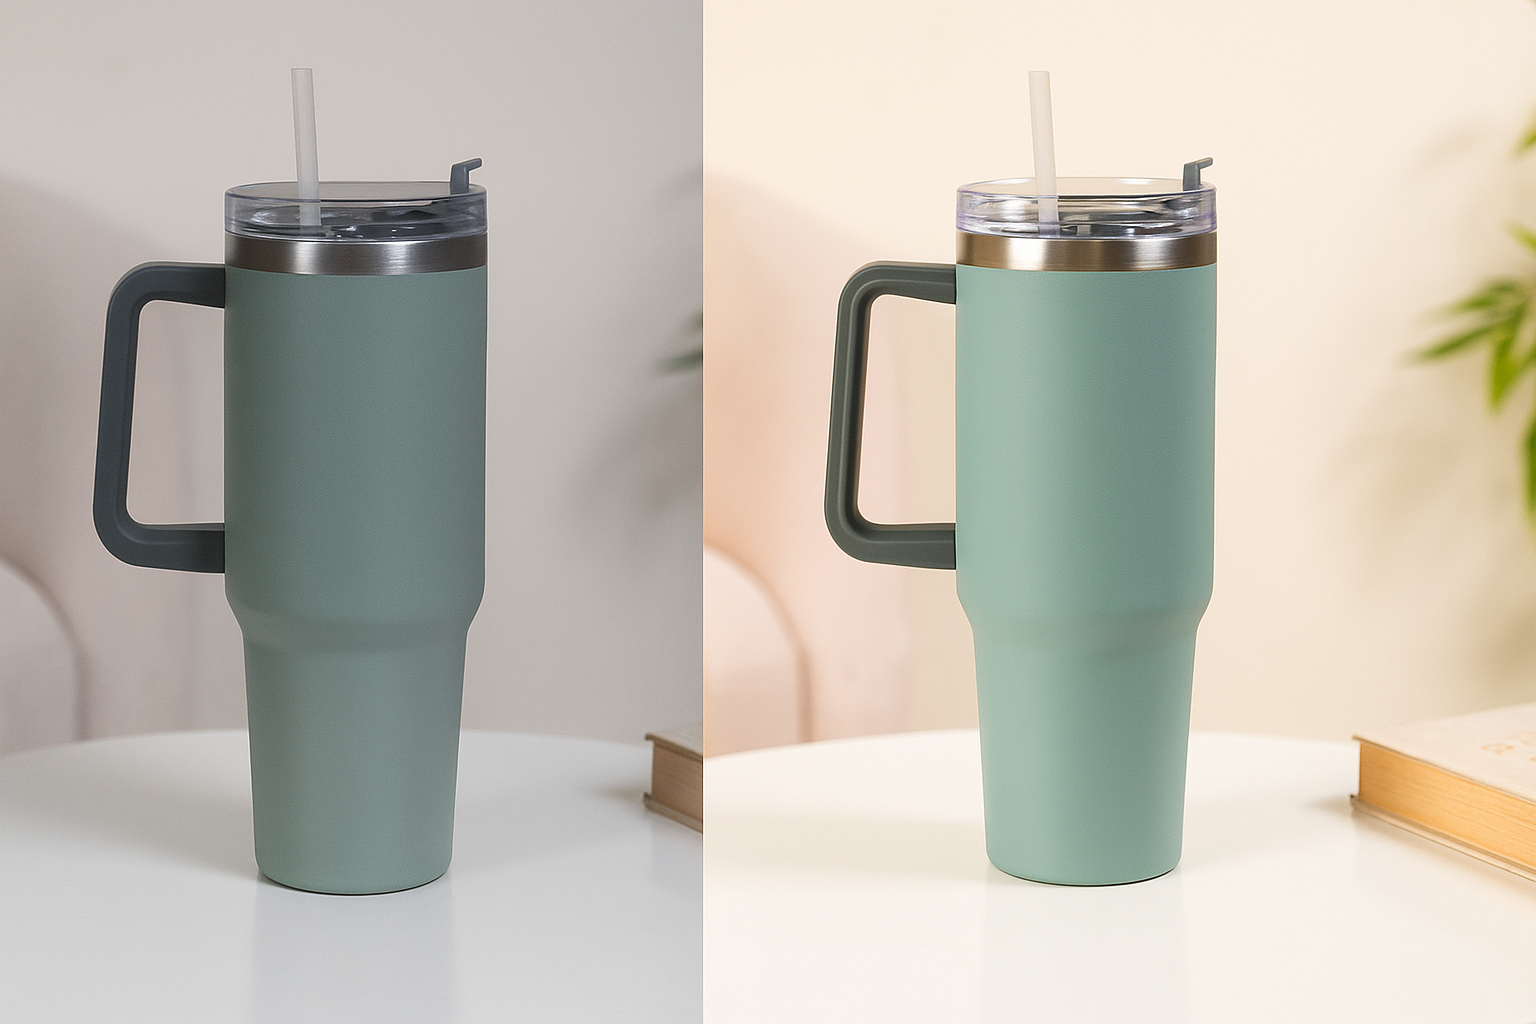
Before vs After
30%

Increase in conversion rates with high-quality photos

64%

Reduction in product returns

40%

More time spent viewing products

10 Professional Photography Techniques

1

Master Natural Lighting

β˜€οΈ

Natural Window Lighting Setup

Side-lit product with soft shadows

Natural light is your secret weapon for professional-looking photos. Position your products 2-3 feet away from a large north-facing window for soft, even illumination. This setup eliminates harsh shadows while providing consistent color temperature throughout the day.

🎯 Pro Techniques:

  • β€’ Use sheer curtains as natural diffusers
  • β€’ Shoot during overcast days for perfectly soft light
  • β€’ Avoid direct sunlight - it creates unflattering hot spots
  • β€’ Golden hour (1 hour before sunset) adds warmth

⚠️ Common Mistake:

Using overhead ceiling lights creates multiple shadows and unflattering color casts.

2

Create Professional Backgrounds

🎨

Seamless Background Setup

DIY curved backdrop tutorial

A clean, distraction-free background keeps focus on your product and creates a professional appearance. The seamless sweep technique eliminates harsh shadow lines and creates that expensive studio look.

πŸ› οΈ DIY Setup Guide:

  1. 1. Tape white poster board to wall at eye level
  2. 2. Curve it down smoothly onto your table
  3. 3. Secure with tape underneath table edge
  4. 4. Use foam core for larger products

πŸ’‘ Budget Alternatives:

Large white bedsheet, shower curtain, or even a white wall can work for smaller items.

3

Stabilize for Sharp Images

πŸ“±

Tripod vs Handheld Comparison

Sharp vs blurry image examples

Camera shake is the #1 killer of sharp product photos. Even the slightest movement during capture can result in blurry images that look unprofessional and hurt sales. Stabilization is crucial for macro shots and detail photography.

πŸ“± Smartphone Stabilization:

  • β€’ Use timer mode (2-10 seconds) to eliminate shake
  • β€’ Enable image stabilization in camera settings
  • β€’ Brace your arms against your body or a surface
  • β€’ Consider a smartphone gimbal for video content

πŸ’° Equipment Recommendations:

Basic tripod: $15-30 | Phone holder: $10-15 | Books as makeshift stand: Free

4

Capture Multiple Angles

πŸ”„

360Β° Product View Grid

Essential angles for e-commerce

Online shoppers can't physically handle your products, so comprehensive visual coverage is essential. Research shows that listings with 6+ images have 32% higher conversion rates than those with fewer photos.

πŸ“‹ Essential Shot List:

  • β€’ Hero shot (main product image)
  • β€’ Back view (labels, care instructions)
  • β€’ Detail shots (texture, materials, craftsmanship)
  • β€’ Scale reference (with common objects)
  • β€’ Lifestyle shots (product in use)
  • β€’ Packaging (unboxing experience)

🎯 Shooting Strategy:

Take 3-5 shots of each angle. You can always delete extras, but you can't reshoot after packing up.

5

Master Visual Composition

πŸ“

Rule of Thirds Demonstration

Grid overlay examples

Good composition transforms ordinary product shots into compelling images that stop scrollers and drive clicks. These principles guide the viewer's eye naturally to your product and create visual interest.

🎨 Composition Rules:

  • β€’ Rule of thirds: Place product on intersection points
  • β€’ Leading lines: Use props to guide eyes to product
  • β€’ Negative space: Leave breathing room around product
  • β€’ Symmetry: Center small items, offset larger ones
  • β€’ Fill the frame: Get close for impact

πŸ“± Phone Settings:

Enable grid lines in camera settings to help with rule of thirds alignment.

6

Style with Strategic Props

✨

Product Styling Examples

Props that enhance vs distract

Props should tell a story and enhance your product's appeal without overwhelming it. The right styling can communicate lifestyle, scale, and usage context while maintaining focus on what you're selling.

🎭 Smart Prop Strategies:

  • β€’ Scale indicators: coins, hands, everyday objects
  • β€’ Lifestyle context: show the product being used
  • β€’ Color coordination: complement, don't compete
  • β€’ Texture contrast: smooth vs rough, matte vs glossy
  • β€’ Geometric shapes: add visual interest subtly

βš–οΈ The 70/30 Rule:

Your product should occupy 70% of visual weight, props only 30%.

7

Achieve Razor-Sharp Focus

πŸ”

Focus Stacking Example

Sharp throughout vs shallow DOF

Sharp focus communicates quality and attention to detail. Blurry products, even slightly soft ones, subconsciously signal poor quality to customers and can kill sales conversions.

🎯 Focus Techniques:

  • β€’ Tap the screen where you want focus
  • β€’ Use AE/AF lock to maintain settings
  • β€’ Take multiple shots with different focus points
  • β€’ Get closer instead of zooming digitally
  • β€’ Clean your camera lens regularly

πŸ”¬ Macro Photography:

For extreme close-ups, consider a clip-on macro lens for smartphones ($10-25).

8

Develop Brand Consistency

🎨

Brand Style Guide

Consistent product photo gallery

Consistent visual branding builds trust and recognition. When customers see your photos, they should immediately know it's your brand, even without seeing your logo. This consistency can increase brand recall by up to 80%.

🎨 Style Elements to Standardize:

  • β€’ Background color and style
  • β€’ Lighting direction and quality
  • β€’ Color grading and saturation levels
  • β€’ Composition and cropping ratios
  • β€’ Font styles for any text overlays

πŸ“‹ Create a Brand Guide:

Document your preferred settings, filters, and editing steps for consistent results.

9

Edit Like a Professional

⚑

Before & After Editing

Subtle enhancements that sell

Good editing enhances your photos without making them look fake. The goal is to make your products look their absolute best while maintaining accurate color representation and realistic expectations.

πŸŽ›οΈ Essential Adjustments:

  • β€’ Exposure: Brighten without blowing out highlights
  • β€’ Contrast: Add punch but keep it natural
  • β€’ Saturation: Enhance colors subtly (5-15%)
  • β€’ Sharpening: Add crispness to edges
  • β€’ Background cleanup: Remove dust and distractions

πŸ“± Recommended Apps:

VSCO (free), Lightroom Mobile (freemium), Snapseed (free), Canva (templates)

10

Test, Measure, and Optimize

πŸ“Š

A/B Testing Results

Performance metrics dashboard

Data-driven optimization beats guesswork every time. Testing different photo styles helps you understand what resonates with your specific audience and drives the most sales for your products.

πŸ“ˆ Key Metrics to Track:

  • β€’ Click-through rate (CTR) from search results
  • β€’ Time spent on product pages
  • β€’ Conversion rate by photo style
  • β€’ Return rates and customer satisfaction
  • β€’ Social media engagement rates

πŸ§ͺ Testing Ideas:

White vs colored backgrounds, lifestyle vs product-only shots, different angles

Essential Equipment & Budget Breakdown

Starter Kit

$15-30
  • βœ“Your smartphone
  • βœ“White poster board ($3-5)
  • βœ“Basic phone tripod ($12-25)
  • βœ“Natural window light

Intermediate

$75-150
  • βœ“Everything in Starter Kit
  • βœ“LED light panel ($25-40)
  • βœ“Reflector/diffuser set ($15-25)
  • βœ“Colored backgrounds ($10-20)
  • βœ“Macro lens attachment ($15-30)

Professional

$200-400
  • βœ“Everything in Intermediate
  • βœ“Softbox lighting kit ($60-120)
  • βœ“Product photography tent ($30-50)
  • βœ“Professional tripod ($40-80)
  • βœ“Editing software subscription ($10/month)

πŸ’‘ Creative DIY Alternatives

Lighting Solutions

  • β€’ Desk lamp + white paper: Instant diffused light
  • β€’ Aluminum foil: DIY reflector for fill light
  • β€’ Shower curtain: Large diffusion panel
  • β€’ White bedsheet: Soft light tent

Stabilization & Props

  • β€’ Stack of books: Adjustable camera platform
  • β€’ Rice/beans in sock: Flexible phone support
  • β€’ Cardboard boxes: Product platforms and angles
  • β€’ Tape: Secure products in position

🚫 Avoid These Common Mistakes

Poor Lighting Choices

Using harsh overhead lights, mixing light sources, or shooting in dim conditions.

Solution: Stick to one light source, preferably natural window light.

Cluttered Backgrounds

Busy patterns, personal items, or distracting elements in the background.

Solution: Always use a clean, neutral background that doesn't compete.

Inconsistent Sizing

Products appearing different sizes across listings, confusing customers.

Solution: Maintain consistent distance and cropping ratios.

Over-Editing

Unrealistic colors, excessive filters, or heavy manipulation that misrepresents products.

Solution: Keep edits subtle and maintain color accuracy.

πŸ“š Additional Learning Resources

πŸš€ Advanced Techniques (Next Level)

360Β° Product Views

πŸ”„

Interactive 360Β° Demo

Create interactive spins using 24-36 photos taken at 10-15Β° intervals around your product.

Learn 360Β° Photography β†’

Focus Stacking

πŸ”

Multiple Focus Points

Combine multiple photos with different focus points for razor-sharp images throughout the entire product.

Master Focus Stacking β†’

Ready to Transform Your Product Photos?

Start implementing these techniques today and watch your conversion rates soar. Remember, great product photography is a skill that improves with practiceβ€”every shot gets you closer to mastery.

πŸ“‹ Your 30-Day Action Plan

Week 1-2: Setup & Practice

  • β€’ Set up your photography area
  • β€’ Practice with 10 different products
  • β€’ Master natural lighting

Week 3: Refinement

  • β€’ Develop your consistent style
  • β€’ Learn basic editing techniques
  • β€’ Shoot multiple angles per product

Week 4: Optimization

  • β€’ A/B test different styles
  • β€’ Analyze performance metrics
  • β€’ Scale your process

πŸ’‘ Quick Win Challenge

This week: Reshoot your top 5 best-selling products using these techniques. Track the difference in engagement and sales over the next 30 days.

Questions? Join our community of e-commerce photographers and get personalized feedback on your shots!